Showing posts with label rv. Show all posts

Sunday, September 14, 2014

Giving the truck a little bit of a lift


I would like to think that it was something that I did to get a truck and trailer combination that are so well matched for each other, but with the way things came together, I don't think that I can take all of the credit. Never the less, we enjoy having a truck that can pull our trailer so easily, and that the trailer falls into the load and towing capacities of the truck. I haven't been concerned or had to deal with headlights pointing up or the back end sagging too much. But there is always room to make things better, which is why we decided to add air bags to the rear suspension to help improve the ride and comfort while towing.

We purchased the Load Lifter 5000 air bags (Amazon link) from Air Lift, getting the specific model for the 2012 Ford F 350. I believe the air bags themselves are the same, but the mounting hardware is vehicle specific, so if purchasing, please make sure you have the correct kit.
All of the parts laid out, coffee ready, and YouTube videos at the ready.
I read the reviews on Amazon and saw that people used YouTube videos to help with the install, which helped relieve any anxiety about installation difficulty. I even got more excited when the box that the parts came in advertised the companies own YouTube channel. I quickly went there to prepare for the install, only to find out that it is a lot of promotional videos with two videos that were not helpful for me, since the trucks that were shown were not my make or model. Thankfully, a few other searches around YouTube gave me a video of a 2013 F 350. The only difference that I had to work around was that I have the factory installed fifth wheel/gooseneck hitch and they had an aftermarket gooseneck. Click here to watch the video.

There are few items I would like to add after watching their video and doing the install myself. If you have access to a vehicle lift, use it. Walking underneath of a vehicle is so much easier than having to crawl under it. If you don't have a lift to use, take off the spare tire, it will create some much needed room. I was able to fully sit up under my truck with the tire off.

Have a few jacks handy. I used one to hold up the axle so I could get the wheel out of the way, and I used the other on the frame to lift it up and give myself some room to put the airbag in place.

Before you start the installation, make sure that you have all of the parts and pieces needed. Air Lift gives you everything you need for a straight install if your truck is factory stock, but if you have added any towing hitches or plates, you will need different hardware depending on what you have installed and some drill bits to make new holes. Speaking of holes...

Even with my factory truck that was supposed to be a straight forward install, the two main holes through the frame for the big 1/2" bolts was partially blocked by the hitch plate, requiring me to make some wiggle room.
This is where I am supposed to be able to fit a 1/2" bolt. Yeah right.

I notched the hitch plate just enough to get the bolt to slide through. Don't forget to repaint the metal after drilling/grinding.
The only other issue I ran into with the install was with some long carriage bolts running close to some lines. I didn't have enough slack to do any rerouting of the lines, so I wrapped the bolts with some rubber splicing tape that I had in my electrical arsenal. This stuff is thick and made to take some high temperatures, so I think it will hold up just fine.
I did this to both sides of the axle. 
I routed the air lines to the back by the license plate. The plastic part of the bumper made for an easy install point. I kept them separate instead of running both lines to a common fill point with the thought of one bag transferring extra pressure to the other in the instance of a load shift/unbalanced load, and didn't want the problem to be exaggerated by the change in pressure.

After finishing the install, I filled both bags to check for leaks and then went for a test drive with a few heavy tool boxes in the back. I could tell an immediate difference in the way the truck handled over bumps and the way that it absorbed the weight. I am excited to pull the house and see how much better the ride will feel.


Monday, May 12, 2014

Our Home Gets A Paint Job!

We have been wanting to paint the inside of our house ever since we bought it, but due to various time and location constraints, it has been that project that has had to be constantly put on the back burner. We have had our colors picked out for over a year and are still carrying around the paint chips. Once we decided to make our stay in Las Vegas longer, I realized that this was the time to get it done. We didn't have any pressing needs for a few days, the hardware store was close by, and the dry desert air would speed along the process. So, off I went to the store to get the supplies, and for around $80 we painted our house. We used Olympic no VOC/low odor primer + paint from Lowes. The paint went on very well, and in most spots it only took 2 coats to completely cover the walls. We got one quart of each color, and still have a little left over in each can.
The colors we used. From L to R: Master bedroom, kitchen, living room slide, kids room, and bathrooms.
Before and after of kids room. We went with a neutral color so that it won't clash with the kids' choices for their beds.

Before and after of the bedroom.
Before and after of the living room slide.
After of the kitchen area.
For those looking for some painting tips:

I put on the first coat a little light to get a base, and then liberally applied the second coat, with just a few touch ups to cover light areas.

Get a 4" roller. There may not be a lot large wall areas, but rolling goes so much faster and a more even coat than a brush.

Don't skimp on the painters tape, especially if you are a perfectionist and like clean even lines. I don't use a lot of tape, and went through 2 rolls just to mask off the areas where I had to work the brush down into crevasses and corners.

If you can paint before you move in, make it a priority. I spent half of my time just moving stuff out of the way.

Thursday, April 24, 2014

Greasing the trailer wheels

One thing that we are very conscious about maintaining is our trailer tires and wheels. Explanations can be found here and here. Recently I realized that I had not checked the condition of our trailer wheel grease and brakes. I did a quick check to see the condition of these items, and was happy to find out that the brakes are still in great condition, but the wheel hubs did need new grease applied to them. I did some quick research on how to DIY, and did not find much help. I quickly learned and figured out what I needed to do, and documented the process to hopefully be an aid to others (videos at end of post).

Starting off, I gathered the appropriate tools and material. I needed to purchase a grease gun and the grease itself. I didn't go with the cheapest grease gun, but still had some issues with it maintaining its prime, so I wonder if I should have gone with a more expensive model. The store did not have enough grease in the 14oz tubes that would fit straight into the grease gun, so I had to purchase bulk cans instead. I feel that the tubes would have been an easier way to go. Everything else I had on hand.

As you can see in the photo, I have gathered:

Grease gun
Grease (1 can or tube per wheel, plus extra)
Nitrile gloves
Rubber mallet
Flathead screwdriver
Pliers
Paper towels
Putty knife
Trash bucket
Bottle jack
Impact to remove tires

Begin by securing the area. Chock opposite tires to prevent the trailer from moving while working on it. Jack up the wheel to be worked on and remove the tire.

The little rubber cap in the middle has been worn out on my tires, so I went to a local trailer supply store and purchased some replacements. I removed that part and discarded, then used the mallet and screwdriver to remove the metal dust cap. It may take a few hits to get it loose. It comes right off once it is loosened.

At this point, clean off the old grease from the quick lube port on the end of the hub, attach the filled and primed grease gun, and start pumping the new grease into the hub. It may take a few minutes to really get the grease moving, but once the new grease starts to push out the old grease, things move along quickly. You will need to stop every now and then to scrape off the old grease into a container. Slowly, the grease will change color from a dull gray to a purplish red. At this point, most of the old grease has been pushed out, and it is up to you how much more you want to pump through the hub.
Once any excess grease has been scraped/wiped away, replace the metal and rubber dust caps and reattach the tire. Move on to the next wheel.

Part 1

Part 2

Part 3

Thursday, January 2, 2014

Replacing the Power Converter

For awhile now, our power converter, the device that is responsible for taking 120 volt AC and converting it to 12 volt DC, has been dying. It's been a slow, painful, agonizing death, complete with buzzing, humming, irregular output, and periods of not functioning at all. So I ordered a replacement for it, and it finally got to us.

As a side note, do not have any imperative equipment fail or need replacement around the holiday times. It will take twice as long for the replacement to get to you than it normally would, and you will be anxious and frustrated beyond belief.

The shiny new converter!
I replaced a WFCO 65 amp converter with a Progressive Dynamics (PD9270V) 70 Amp Power Converter . I originally looked at a direct replacement, but the WFCO had some bad reviews, and I didn't want to have to deal with the same issues in a year or two. The Progressive Dynamics model comes with the company's Charge Wizard circuiting, which is a multi mode operation allowing for normal operation/charging, a quick charge mode, a storage mode, and a desulfation mode. The unit is designed to automatically select the mode needed, but also comes with a remote pendant to allow manual selection.

Installation was pretty easy. I had already done the leg work of locating the old converter, which was pretty easy with the noise that it was making. Access was behind a panel in my basement, which gave ample work space.


The panel is easily removed with four screws to reveal...

...the power converter (and some plumbing. Not well thought out if you ask me).
Always remember to shut off all electricity before working on any appliance. In this case it meant shutting off the breaker in the 120 volt panel as well as disconnecting the battery. Safety first.

Removal and installation was a breeze. Remove two screws holding down the existing converter, unhook the positive and negative wires from the DC output side, and remove the grounding/bonding wire from the housing. The converter is connected to the 120 volt paned via a standard Edison plug. This was the hardest part of the process, since I had to reach my hand into the dark hole to feel where it went. Reverse the process for installation.
The new converter in place.
As I mentioned, the converter came with a remote pendant. We have a closet directly above the power center, providing a convenient place for installation.
Glad I can close the door, that green light is bright!

I'm very excited to have a consistent 13.5 volts, even with all of the 12 volt lighting and systems in use. All in all, the whole job took about 20 minutes.


Wednesday, July 31, 2013

I can change a tire in less than 30 minutes

What prompts a title like this?

A little over a week ago, we left Alabama. We were heading to Ohio to spend a week with family and friends at Memorial Holiness Camp, a camp meeting that I (Jason) have grown up attending. As we were driving north to the outskirts of Birmingham, we heard that dreaded noise: POW! I immediately began to pull over while checking my mirror. I saw the fragments of what used to be my trailer tire finding a new home along the Alabama Interstate Highway. Thankfully, it was a merge from the left ramp that I was taking, and the faulty tire was on the drivers side, so I was able to work out of the way of traffic.

I quickly assessed the damage, saw that it was only cosmetic and could wait, and then began the process of changing the tire. I have learned a few lessons from a year ago (read that adventure here), and pulled out my tire changing kit.
It includes:
1-6 ton hydraulic bottle jack
1-12 ton hydraulic bottle jack
1-18 volt impact driver
1-Air compressor with hose and fittings
1-Set of deep well impact sockets
1-High visibility vest (not pictured)
1-18 volt high torque impact driver (added after this incident)

I quickly had the trailer off the ground and the tires swapped out. I don't have a photo of this exact tire, but catastrophic failure is an accurate description. We were soon on our way, chalking this mishap up to horrible Alabama roads and the unofficial state animal, the road gator.

Having kept two tires from our first set that we changed out in St. Louis, we found the nearest Walmart to have one of them mounted to our rim. It may be hard to find a tire, but finding a place to mount a tire to a rim is easy and cheap. We were soon back on our way.

About 30 minutes later, we heard the same sound again. Sure enough, another tire has bit the dust (catastrophically), this one on the passenger side.

Not letting the situation get me down, I hopped out and speedily got this tire changed as well. I'm starting to think to myself, 'I am getting pretty quick with this tire changing business'. I wasn't done.

We once again found ourselves hunting for the closest Walmart to mount the second of our 'spare spares' to a rim. Those gentlemen had us in and out in no time. It was time to hit the road again, trying to figure out how far we may make it with the delays.

By now I am driving a little more cautiously. We make it across the state line into Tennessee, breathe a sigh of relief thinking that we are beyond the horrible Alabama roads and should have some smooth sailing through the Volunteer State. Wrong.

We use a tire pressure monitoring system (TPMS) on the trailer tires so that we are always up to speed with their pressure and temperature. The system will alert us when the tires are outside of a preset pressure range or exceeding a set temperature. In the case of a catastrophic failure where the tire comes apart in .0125323 seconds, it does not give much warning. With our third tire, it started beeping with a warning. I did not even give it a thought, I just started to decelerate and pull the trailer to the side of the road. I'm glad I did. In less than 15 seconds, the tire went from full and rolling to stopped and flat on the ground. A piece of steel belt had punctured the tire, causing a rapid air loss. Off went that tire and on went the last spare.

That meant it was time to find a place for the night, and hope that we could get there. We were able to make it 10 more minutes up the road to a campground about an hour south of Nashville. This was not even half way to where we had planned on getting for the day.

But we were safe and in one piece.

The next day we were able to find a place 30 minutes north of where we were camped that could get us a new set of tires, including a 'spare spare'. After some back and forth, we had a new set of tires and were on our way. Even with all of the delays and such, we still made it to our destination about 6 hours later than originally planned.

*     *     *     *     *

Overall damage was just cosmetic to the under skirting, which I was able to mostly bend back into place. Having one jack has been handy, but having two jacks seems to be invaluable. More info on the air compressor can be found here.
I used the impact driver with a socket adaptor and the impact sockets, but I would not recommend long term usage. It had enough torque for the lug nuts, but the adaptor was getting stuck inside the chuck with all of the hammering. We had already planned to get the high torque impact, this situation just upped our timeline.

Monday, July 8, 2013

Air Compressor

I have been wanting to upgrade to an air compressor that is capable of easily airing up our tires as well as being portable. After doing some research, I found one that also runs off of 12 volts DC, so as long as I have a running vehicle, I have a working air compressor. I bought a Q Industries MV 50 compressor.
 
It is a popular compressor amongst four wheeling enthusiasts because of its capability to air up a tire in just a few minutes. The compressor is meant to be used directly next to the tire. Once you turn it on, it is pushing air at full boar with no relief unless you are connected to a tire. The little hose that came with it wasn't going to cut it for my needs, since I want to be able to reach any tire with out having to move the vehicle. So I put together a T with a quick connect to hook to the compressor, a pressure relief valve, and another quick connect for my hose. It works out perfectly setting the relief at 80 psi, since the most pressure that I will need is about 70 psi. It gives me a quick and convenient way to air up bike tires and toys as well.
I added a tire adaptor with pressure gauge to make things easy on that end, and also some blower nozzles for cleaning up. So far, it has proven to be a mighty little compressor in filling up tires. It comes with a storage bag, which holds everything perfectly.


Friday, April 26, 2013

Standing on one leg

Over the past few months (6 or so), we have had some on again/off again issues with our front landing jacks. Some sticking, some not wanting to move, and most recently, total failure. Thankfully, not catastrophic, but that is mostly because the fifth wheel was still hooked up to the truck. With each incident, we have tried different remedies, trying to systematically work through the whole system to isolate the issue. There may have been several, but I am now confident that they will work normally from now on, since I have taken off and tested the motor, inspected and greased the reduction gear box, installed a new wireless controller and overloads, and now a brand new leg.

As I mentioned, the most recent failure was several threads inside the opposite door jack just shearing off, causing the leg to not support any weight. It happened when I was getting ready to unhook from the truck and had just started to take the weight off of the truck, so it just returned the load to the truck.

For anyone wondering what it takes to replace one of these legs, it is really, really easy. It took me 20 minutes to pull off the bum leg and about 45 to put the new one on, but I did take some extra time to clean some items up while I had the system disassembled and to document the process. The photos are of a Keystone Mountaineer 345DBQ, and the parts are from Lippert. Parts and shipping for the leg were about $320.
The old leg in back and new in the front. I had to take the foot and locking pin off of the old leg and put it on the new one. A little WD-40 to clean them up and they almost look new.

The two brackets that the leg mounts into.

The leg bolted into the brackets.

The bracket where it is welded to the frame. Take note of the protrusions on the leg and how they sit on the bracket. This is how the load is primarily transferred from the frame to the leg. The bolts are there to hold these in place. Be sure that both protrusions are properly seated before placing weight onto the leg.

The view looking up.

Inside the front compartment, this rod is how the motor attaches to the leg and actuates it. For our rig, one motor controls both legs.

Attach the motor. I left the other leg off of the motor and adjusted the new one to match the existing leg first...

...then I hooked up the tie rod so that they would operate in sync. I set the RV onto some temporary stands so that I could then let the legs take the weight.

And viola! We have a new leg installed. I marked the factory 'all the way in' point with a sharpie so that I knew how far I could run it in with out damage.

Because of the legs mounting to the outside of the frame, it was easy to slide it in and out, and I didn't have to worry about being over a pit to have to slide it straight down. I know that other rigs don't have this much access and clearance and may require extra steps/effort to accomplish this process. I hope that this is informative and a useful aide for anyone wanting to work on their legs.

Thursday, March 21, 2013

Free WiFi!

Honestly, I don't think that it matters who you are, hearing those words seems to make any person's day. Being a constantly connected society, having access to an Internet connection with any reasonable amount of speed can make most people giddy. It seems that we are getting to the point that most retail establishments offer some type of Internet access while you wait or dine.

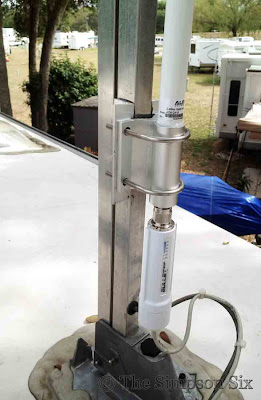
On the road, we are constantly looking for an Internet connection so that we may update our apps and software, connect on Facebook and check email, and to write blog posts such as this one. A recent step that we have taken to help out with a more reliable connection and speed while not taxing our cellular data plan is to install a system to extend to existing wifi networks that we normally would not be able to access from our campsite. Thanks to our friends at Full Time Families for their initial write up on this system and to Steve for showing me how his setup works, I went ahead and purchased the hardware that I didn't have on hand and got to work. Below, you will find links to the products at Amazon. I already had the cabling and router on hand, but have included links to those as well.


The installation of the hardware was the easy part for me. I spent some time planning out how I wanted the wiring to be run down into the RV and then began with a Lowe's run to get the last few things that I needed. I planned on mounting the antenna to my TV antenna so that I could raise and lower it easily for travel.
Material to mount the antenna
I needed to create a bracket since the U bolts would not fit around my TV antenna in the down position. I used a piece of 1 inch angled aluminum that I cut two 4 inch pieces off of, then pre-drilled holes to line up with the antenna holes for the U bolts. I didn't want to screw the angled pieces onto my antenna and risk nicking the TV antenna cable or the screws getting loose over time, so I very permanently mounted it with some JB Weld. I used the Kwik Weld, since I am familiar with the product and was ready to move quickly. If you have never used JB Weld before, use gloves and have a lot of disposable surface available (read cardboard or plastic). It is a very permanent bond, with at least a 3000 psi breaking rating.

So my antenna is not going anywhere.

Once I attached the bracket to the antenna, I ran the cat 6 cabling to give the JB Weld time to cure. My TV antenna sits next to my front air conditioning unit, and I was able to find a path for the wire to come down into the RV there. I was unable to fish the wire through the ceiling, so I opted to use some wire mold to conceal and support the wire over to the router.
Clean and polished.
Once that was done, I went back to the roof to finish the installation. I attached the antenna to my bracket, hooked the bullet to the wire, and then connected the bullet to the antenna. A few cable ties to keep things neat, and Voila!


The unit raises and lowers very easily and with little strain. I am happy with how clean the installation ended up being, albeit the fact that I cannot adjust the antenna up or down, but it is 14 feet off of the ground, so I think that reception will be alright.

There really aren't any setup instructions for the software on the bullet, but the company does offer a wiki and support forum for questions and troubleshooting. I was fortunate to have someone familiar with the interface that could field my questions. Being someone who is enough of a techie to be dangerous, I found it simple enough to use. Once the initial settings are taken care of, it is just a matter of logging into the bullet and selecting a wifi network to connect to. I have already noticed a huge difference in power and reception. I am able to 'see' 3 times as many networks as before. The down side is that even though I can 'see' some networks, they are not powerful enough to be able to communicate back and forth enough for me to use them.

Thursday, December 20, 2012

Honey, let's eat on the floor for a few days

As it is with most RV remodel/modifications, it begins with a thought. A 'What if' or 'What do you think about this', and then the ball just picks up speed from there.

For this go around (admitting that it won't be the last), my wife brought up the idea of an L shaped dinette to replace the booth that came with the rig. The goal was to make it so that all 6 of us could sit at the table together. The booth was set up so that just the 4 kids fit. 

We first looked for something that was already made, checking local furniture stores, consignment shops, and even the thrift stores. We did not find anything. Not, we didn't find anything close. We just didn't find anything. So, time for a custom build.

Since it had been more that 2 days since I had last worked, I heard 'PROJECT' and took off with the idea. I soon had my sketch book out, drawing angles, taking measurements, creating a cut list, and making a material list.

This is the point that my wife chuckles on the outside, saying 'You're cute', but inside she is saying 'Yes!' and patting herself on the back.

After a preliminary run to the hardware store to confirm some materials were available and finishing up the plans, I was off. I do find it humorous that we didn't get back home until 3:30 with the first load of material, but I jumped right in until it was too dark to work.
The booth that came in the RV...
...quickly turned into this.
I jumped right back into the project the next morning, politely waiting a half hour after quiet hours was over so as not to disturb any neighbors. Soon I had the base put together and brought it inside for a dry fit.

It wasn't long before I had all of the wood cut and assembled, so it was time to stain and polyurethane.
Assembly and staining outside.
My timetable was thrown off some because of the humidity affecting drying times, so I had to move things inside once it got too dark and the temperature dropped some.
Let it sit overnight to fully cure and dry.
The next morning was final assembly and trimming out. To save a few inches, I only built a back on the portion against the couch. The wall can be leaned on, and we can use some cushions if someone needs better support. The kids are the ones sitting back there, but they sit forward and not against the wall.

My goal was to try to have a zero weight change. I didn't pull out a scale or anything, but after lifting each of the old benches and then the new ones, I came within a pound. We do have more storage under each bench than before, and it is easier to access thanks to a hinged lid instead of having to take the cushions and base off to get below. For the time, we are reusing the table that came with the RV. It is a close fit, but I wouldn't mind having something that is made for the space and matches the new furniture.

Stephanie found a few folding chairs and pillows from World Market to put on the finishing touches.
Finished product.
We now have a space where all 6 of us fit. We tried it out for dinner, and it fits perfectly.